How about building your own infra-red (IR) Thermometer?
Instead of buying a finished product, you might be interested in building your own IR Thermometer instead. This way, you can learn how it works and you are able to design it exactly the way you want it to be. For example, how about building wireless sensors which transmit data to a central receiver unit?
In this article, I’ll show you the basics. Components which I’ll be using for this are:
- IR temperature sensor: I’ll be using the MLX90614 (this version to be precise). It has a range from -70 up to +380 C and a resolution of 0.02 C.
- Microcontroller: I’ll be using a 8-bit microcontroller from Microchip: PIC16F690, but the program included in this article can easily be ported to any other 8bit microcontroller.
- Display: You can use any HD44780 compatible display; I’ll be using the EAW162B-N3LW
You will also need a programmer (I recommend using the PICKit2) to write your program into the micro-controller and an oscilloscope might came in handy for analyzing and debugging. For source code development, I used the Microchip MPLAB IDE, which you only need if you want to compile your own binary.
The test setup
To test the sensor and the assembly code, I use the following setup. A 9V battery is used for the power supply and the 78L05 voltage regulator converts this to a 5V power rail. If you rather want to use a 5V supply directly, you can of course skip the regulator. For the pull-up resistors R1 and R2 I choose 10KOhm. R3 is a 10KOhm potentiometer which is used to regulate the display contrast. R4 is needed for the LED background light built into the LCD display planet. You should check the datasheet of your display for the correct value. C1 and C2 are for filtering and have a value of 100nF.
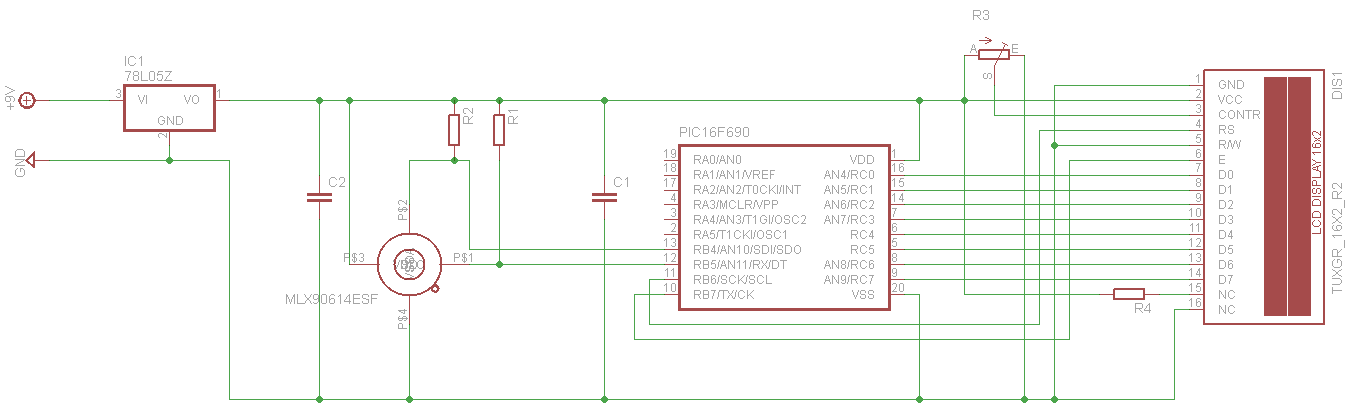
(Please note that the display module shown in the drawing is not the same one which I used for my setup)
Reading the temperature from the sensor
The IR sensor, which is a digital sensor with it’s own microcontroller on board, provides two temperature readings: A) the sensors own (body) temperature and B) the object-in-sight temperature, measured using infra-red. For this project, I’ll be reading and showing both values.
The sensor (when not in sleep mode) will constantly measure the current temperature and store the result into it’s own internal memory. The already calibrated and ready to use temperature measurements can then be fetched from the sensor’s memory using the SMBus protocol. Using the sensor’s documentation and my oscilloscope, I developed the assembly code needed to read the measurements from the sensor. The source-code for this is provided below and is located in the smbus.asm module.
Converting the data to degrees Celcius
In order to convert the temperature values received from the sensor to degrees celcius, the raw value has to be multiplied by 0.02 according to the documentation. The result is the temperature in degrees Kelvin with two decimal precision. Substract 273.15 from that and you have the temperature in degrees celcius. To do this calculation on the microcontroller, I first subtract 27315 (273.15 x 100) from the raw value and then divided the result by 100. This way, I don’t have to worry about the comma until the very last step. The code for this conversion can be found in main.asm. The code makes use of this excellent assembly math library.
Showing the result
I first sent the readings via the serial port (using rs232) to my PC, but I quickly realized that using this method doesn’t really promote the idea of making a portable thermometer. So I replaced the rs232 output with an LCD display (HD44780 based) instead. Both the rs232 code and the LCD code is included in the source-code package though and can be found in the rs232.asm and display.asm modules.
Main loop
Now, to see the thermometer in action, I created a tiny main loop in main.asm which clues together the above mentioned modules. It basically configures the microcontroller after power-on-reset and then goes into an infinitive loop performing: A) 1 second delay, B) read latest temperature from the sensor using the smbus.asm module, C) convert to degrees celcius and finally D) show the value on the display using display.asm module.
The source & binary
Download the source code and the binary hex file (compiled for the PIC16F690) here:
Sensor in action: